Git basics: Create a fork and submit a pull request
This article describes how to work in a shared repository where other people submit their commits. You’ll use a GitHub test repository and create a fork, which copies the repository to your GitHub account. In your fork, you’ll create a working branch and make a change. After you commit the change to your fork, you’ll submit a pull request. A pull request is how you ask the repository maintainer to add your changes to their repository.
Visual Studio Code (VS Code) is used as the Markdown editor and the terminal for Git commands. If you need to set up your environment, see Git basics: Get started with Git and GitHub.
This article is written as a beginners guide for Git and GitHub. The GitHub repository octocat/Spoon-Knife is used to create a fork and submit a pull request.
Create a fork
To create a fork, use GitHub’s octocat/Spoon-Knife repository. The fork is a copy of the repository that’s stored in your GitHub account.
- Sign in to GitHub.
- Go to the repository: octocat/Spoon-Knife.
- On the top, right corner of the page, select the Fork button. A dialog box opens with the prompt Where should we fork Spoon-Knife?
- Select the link for your GitHub account.
A page opens as the fork is created and the fork’s name is <GitHub account>/Spoon-Knife. Under
your fork’s name, forked from octocat/Spoon-Knife links to the upstream repository.
Clone the fork
After you create the fork, clone it to your computer.
- Launch VS Code and open a terminal: Terminal > New Terminal.
-
Use PowerShell commands to create a directory for your repository and switch to that directory.
New-Item -Path "C:\github\forkdemo" -ItemType Directory Set-Location -Path "C:\github\forkdemo"New-Itemcreates the directory C:\github\forkdemo andSet-Locationswitches to the directory. - From your GitHub fork, select the Code tab and select the Code button.
- Select HTTPS and use the clipboard icon to copy the URL.
-
From the VS Code terminal, paste the link to clone the repository.
git clone https://github.com/<GitHub account>/Spoon-Knife.gitThe output shows the progress.
Cloning into 'Spoon-Knife'... remote: Enumerating objects: 16, done. remote: Total 16 (delta 0), reused 0 (delta 0), pack-reused 16 Receiving objects: 100% (16/16), done. Resolving deltas: 100% (3/3), done. -
After the clone is finished, switch to the repository’s directory.
Set-Location -Path "C:\github\forkdemo\Spoon-Knife"
Create an upstream remote
Each cloned GitHub repository creates a remote for the fetch and pull commands. When you work
with a shared repository, you need an upstream remote for the fork so that you can sync your
clone. In this example, the upstream remote is the URL for octocat/Spoon-Knife.
-
From a VS Code terminal, show the existing remote.
git remote -vThe output shows the
originremote for your fork.origin https://github.com/<GitHub account>/Spoon-Knife.git (fetch) origin https://github.com/<GitHub account>/Spoon-Knife.git (push) -
Create the
upstreamremote foroctocat/Spoon-Knife.git remote add upstream https://github.com/octocat/Spoon-Knife -
Run
git remoteto display the newupstreamremote.origin https://github.com/<GitHub account>/Spoon-Knife.git (fetch) origin https://github.com/<GitHub account>/Spoon-Knife.git (push) upstream https://github.com/octocat/Spoon-Knife (fetch) upstream https://github.com/octocat/Spoon-Knife (push) -
Sync your clone with the
upstreamrepository so that your local clone has the most recent files.git fetch upstreamThe output shows the branches that are fetched from
upstream.From https://github.com/octocat/Spoon-Knife * [new branch] change-the-title -> upstream/change-the-title * [new branch] main -> upstream/main * [new branch] test-branch -> upstream/test-branch -
From the
mainbranch, merge the changes.git checkout main git merge upstream/mainBecause we’re using a test repository, there won’t be any changes in the upstream repository. In a real world scenario, there would be changes to merge.
Already on 'main' Your branch is up to date with 'origin/main'. Already up to date. -
After the merge, only your local clone is updated. To finish the repository sync, you need to
pushthe changes to GitHub.git push origin main
Create a working branch
From the main branch of your Spoon-Knife clone, use the following commands to create a working
branch. This example names the working branch my-test-pull-request.
git checkout -b my-test-pull-request
git push origin my-test-pull-request
For more details about how to create a working branch, see Create a working branch.
Commit a change
Edit a file and commit the change. The Spoon-Knife repository contains index.html that has a
section labeled for edits.
- From VS code, open index.html.
- Edit the file and save the change.
-
Commit the change.
git add . git commit -m "updates index.html" -
Push the change to your fork.
git push origin my-test-pull-request
For more details about how to edit and commit, see Edit a file.
Create a pull request
After your commit is pushed to your fork you submit a pull request. This is the standard practice
because contributor’s to an upstream repository don’t have write access to the repository.
- From your GitHub account, go to your
octocat/Spoon-Knifefork. -
On the fork’s Code tab you’ll see banner that you pushed changes to your working branch.

- Select the Compare & pull request button and the page to Open a pull request is displayed.
-
Verify that your fork and branch will be merged into the upstream repository and
mainbranch.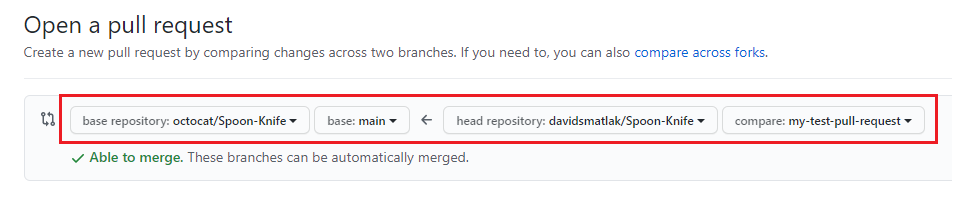
-
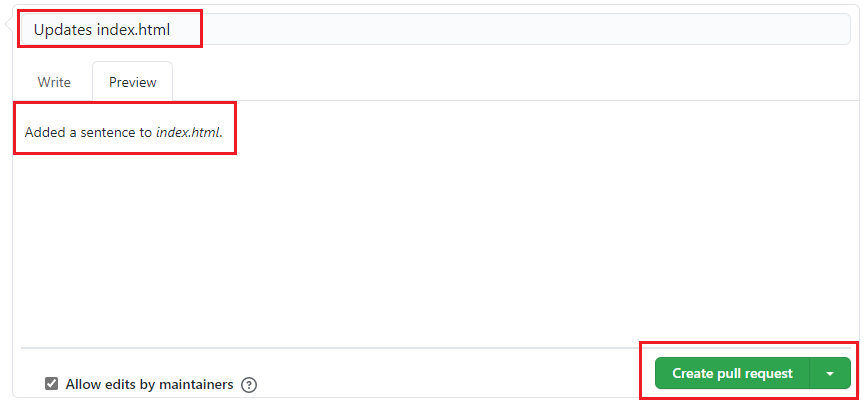
Add a title and comment to explain your pull request, then select the Create pull request button.
In a real world scenario, after a pull request is submitted, the repository's maintainer reviews your pull request. The maintainer will either request additional changes or approve your pull request and merge your changes into the `upstream` repository.
For this example, after you submit your pull request, you should close it because the repository doesn't merge the changes.
Clean up
When you’re done and no longer need the repository, delete your repository from GitHub and the local clone.
- From GitHub, there’s a drop-down menu at the top, right of the page. Select Your repositories
- Select Spoon-Knife.
- Select Settings and scroll down to Danger Zone.
- Select Delete this repository and follow the prompts.
- To delete your local clone, remove C:\github\forkdemo\Spoon-Knife.
Conclusion
In this article you learned how to fork a repository and submit a pull request. To learn more, see the documentation for Git and GitHub.